Today was... yes, another day in paradise. Ryan took us out on the waters off Kona again. Warm, clear and almost surreal. I took my camera and snapped over 150 photos but wanted to experiment on the cool black and white images that have some color accents. Here's the simple workflow that I used for the goods:
- Bring photo into Photoshop
- Adjust levels
- Level out the horizon
- Image/Adjustments/Vibrance - Adjust accordingly
- Image/Mode/Grey scale
- Save As/Jpeg/Save As with extension _bw.jpeg
- On original image - Delete Grey Scale in history list (or on a PC - Ctrl+Alt+Z until you get back to the color image)
- Open image with _bw.jpeg extension
- Select all and copy
- Go back to original color image file and paste the _bw.jpeg image on new layer
- Click to hide the new _bw.jpeg layer
- On original color image layer, zoom in and use selection tool and select the part you want to be color
- Unhide the layer with the black and white image
- With the black and white layer selected, click delete
- Boom! Done.
- Resize and watermark.
- Save As...
That was my quick and easy way. Got another method. Share please. Now, the goods:
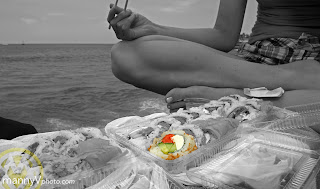 |
| Lunch time on the rock wall in downtown Kailua Kona. |
 |
| Mailei SUPing past the Royal Kona Resort. |


desaturate image and then use the erase tool, run it over everything you want in colour
ReplyDeleteJoel, you da man! Thanks. I would first do all the color corrections then duplicate the layer twice. One will be the background color and the top layer I'd desaturate. Good times.
ReplyDelete